Rubix Compute: Modbus RS485 Wiring
Modbus RS485 Terminal Wiring
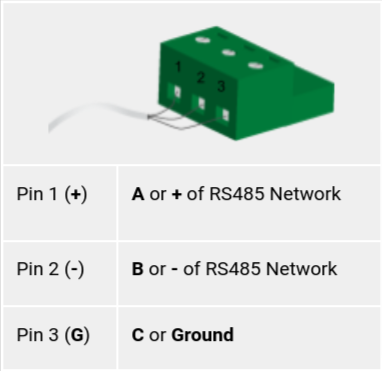
To establish communication with Modbus RS485 devices, the RS485 connectors are terminated and installed as shown below.
Modbus RS485 Networking
When Networking multiple devices on an RS485 network, each controller is connected in a `Daisy Chain`. Controllers that are connected between 2 other controllers will have 2 wires (one from the previous controller and one from the next controller) in the same terminal. Ensure A/+ and B/- wires are kept consistent for all controllers on the network.
 Warning: Inverting the A/+ and B/- connections of the devices on an RS485 network may prevent it and other devices on the network from functioning correctly.
End Of Line Termination
When connecting a RS485 network, the first and last device on the network must have an End Of Line (EOL) resistor installed. On the Rubix Compute this is done via an Onboard Jumper. The location of the EOL Jumper is shown below. When the jumper is installed in the upper position the EOL resistor is set. When the jumper is installed in the lower position the EOL resistor is not set. There are 2 sets of jumpers, 1 for each of the RS485 networks.
RS485 Network Wiring
When wiring an RS485 network a single shielded twisted pair (STP) cable should be used. The twisted pair cable cancels out interference and ensures that the 2 conductors are at the same lengths. Having a ground shield on the twisted pair cable further provides protection to interference on the RS485 network.
Related Articles
Related Articles
Rubix iO: Modbus RS485 Wiring
Nube-iO Rubix IO Modules are a pure Modbus device; All communications with the IO Modules are via Modbus. This article will detail the correct wiring for the Modbus RS485 Network. To communicate via Modbus the Rubix IO Module must also have its ...Rubix Compute: Power Requirements and Wiring
Warning: Power requirements are different for older models of Rubix Compute. To determine the device version of Rubix Compute, see: Rubix Compute: Identifying Hardware Version If Rubix Compute hardware is Version 0.8 or below, DO NOT FOLLOW the ...Rubix Compute: Legacy Power Requirements and Wiring
WARNING: This article is intended for Rubix Compute devices version 0.8 and below. To determine the device version of Rubix Compute, see: Rubix Compute: Identifying Hardware Version Power Supply Requirements Power Supply Wiring Versions 0.8 and below ...Rubix Compute: Installation and User Manual
Please download the document attached below.Rubix Compute: Overview
Hardware Overview Power Supply Requirements Power Supply Wiring The Nube-iO Rubix Compute Gateway Controller is powered by a 24v AC or DC power supply on the `24 AC/DC POWER` terminals as shown below. Wiring Diagram: Mounting The Rubix Compute 5 is ...